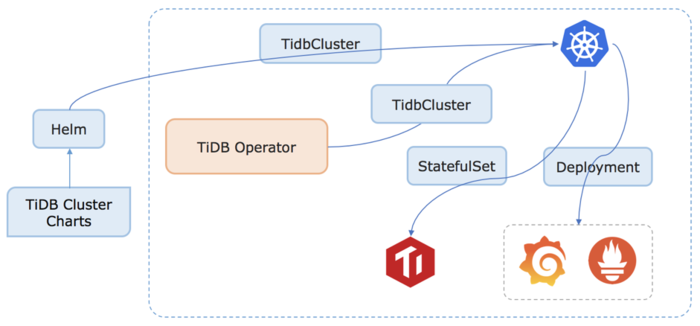
TiDB-Operator
TiDB Operator 是基于 Kubernetes 内置的 StatefulSet 开发的 TiDB 集群管理和运维工具。
TiDB Operator 工作流程图:
启动 3 个节点的 kubernetes 集群的操作步骤
1. gcloud 创建项目
1
2
3
4
5
6
|
$ gcloud create project maiyang1
gcloud projects create maiyang1
Create in progress for [https://cloudresourcemanager.googleapis.com/v1/projects/maiyang1].
Waiting for [operations/cp.5933510498278076091] to finish...done.
Enabling service [cloudapis.googleapis.com] on project [maiyang1]...
Operation "operations/acf.ae9b988b-8aed-4303-9ac1-82c9ec1630fa" finished successfully.
|
2. gcloud 配置项目和设置可用区
1
2
3
|
$ gcloud config set project maiyang1 && gcloud config set compute/zone us-west1-a
Updated property [core/project].
Updated property [compute/zone].
|
3. 创建 TiDB 集群
启动一个包含 3 个 n1-standard-1 类型节点的 Kubernetes 集群。
为什么是 n1-standard-1 类型节点呢?(后续再补)
 1
 2
 3
 4
 5
 6
 7
 8
 9
10
11
|
$ gcloud container clusters create tidb
WARNING: In June 2019, node auto-upgrade will be enabled by default for newly created clusters and node pools. To disable it, use the `--no-enable-autoupgrade` flag.
WARNING: Starting in 1.12, new clusters will have basic authentication disabled by default. Basic authentication can be enabled (or disabled) manually using the `--[no-]enable-basic-auth` flag.
WARNING: Starting in 1.12, new clusters will not have a client certificate issued. You can manually enable (or disable) the issuance of the client certificate using the `--[no-]issue-client-certificate` flag.
WARNING: Currently VPC-native is not the default mode during cluster creation. In the future, this will become the default mode and can be disabled using `--no-enable-ip-alias` flag. Use `--[no-]enable-ip-alias` flag to suppress this warning.
WARNING: Starting in 1.12, default node pools in new clusters will have their legacy Compute Engine instance metadata endpoints disabled by default. To create a cluster with legacy instance metadata endpoints disabled in the default node pool, run `clusters create` with the flag`
--metadata disable-legacy-endpoints=true`.
WARNING: Your Pod address range (`--cluster-ipv4-cidr`) can accommodate at most 1008 node(s).
This will enable the autorepair feature for nodes. Please see https://cloud.google.com/kubernetes-engine/docs/node-auto-repair for more information on node autorepairs.
ERROR: (gcloud.container.clusters.create) ResponseError: code=403, message=Kubernetes Engine API is not enabled for this project. Please ensure it is enabled in Google Cloud Console and try again: visit https://console.cloud.google.com/apis/api/container.googleapis.com/overview?p
roject=maiyang1 to do so.
|
出现错误的原因是我们必须要启用 kubernetes Engine API,此过程会涉及开通结算账号。
 1
 2
 3
 4
 5
 6
 7
 8
 9
10
11
12
13
14
15
|
$ gcloud container clusters create tidb
WARNING: In June 2019, node auto-upgrade will be enabled by default for newly created clusters and node pools. To disable it, use the `--no-enable-autoupgrade` flag.
WARNING: Starting in 1.12, new clusters will have basic authentication disabled by default. Basic authentication can be enabled (or disabled) manually using the `--[no-]enable-basic-auth` flag.
WARNING: Starting in 1.12, new clusters will not have a client certificate issued. You can manually enable (or disable) the issuance of the client certificate using the `--[no-]issue-client-certificate` flag.
WARNING: Currently VPC-native is not the default mode during cluster creation. In the future, this will become the default mode and can be disabled using `--no-enable-ip-alias` flag. Use `--[no-]enable-ip-alias` flag to suppress this warning.
WARNING: Starting in 1.12, default node pools in new clusters will have their legacy Compute Engine instance metadata endpoints disabled by default. To create a cluster with legacy instance metadata endpoints disabled in the default node pool, run `clusters create` with the flag`
--metadata disable-legacy-endpoints=true`.
WARNING: Your Pod address range (`--cluster-ipv4-cidr`) can accommodate at most 1008 node(s).
This will enable the autorepair feature for nodes. Please see https://cloud.google.com/kubernetes-engine/docs/node-auto-repair for more information on node autorepairs.
Creating cluster tidb in us-west1-a... Cluster is being health-checked (master is healthy)...done.
Created [https://container.googleapis.com/v1/projects/maiyang1/zones/us-west1-a/clusters/tidb].
To inspect the contents of your cluster, go to: https://console.cloud.google.com/kubernetes/workload_/gcloud/us-west1-a/tidb?project=maiyang1
kubeconfig entry generated for tidb.
NAME  LOCATION    MASTER_VERSION  MASTER_IP     MACHINE_TYPE   NODE_VERSION   NUM_NODES  STATUS
tidb  us-west1-a  1.12.8-gke.10   34.83.196.63  n1-standard-1  1.12.8-gke.10  3          RUNNING
|
4. 将刚刚创建的集群设置为默认集群
1
2
|
$ gcloud config set container/cluster tidb
Updated property [container/cluster].
|
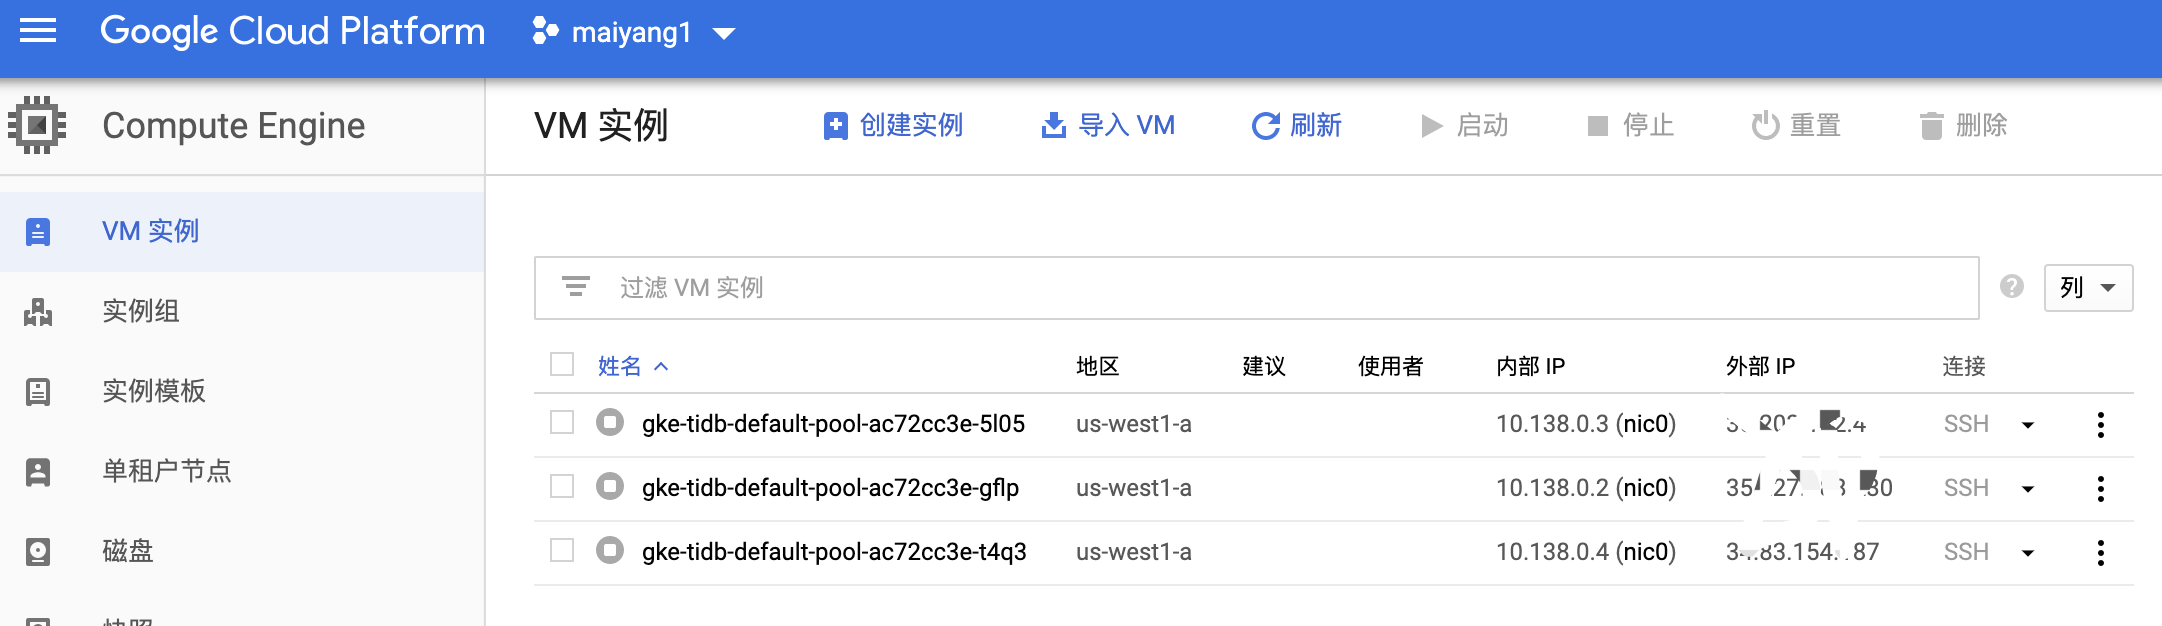
5. 验证创建的集群节点情况
1
2
3
4
5
|
$ kubectl get nodes
NAME                                  STATUS   ROLES    AGE     VERSION
gke-tidb-default-pool-ac72cc3e-5l05   Ready    <none>   3m59s   v1.12.8-gke.10
gke-tidb-default-pool-ac72cc3e-gflp   Ready    <none>   3m59s   v1.12.8-gke.10
gke-tidb-default-pool-ac72cc3e-t4q3   Ready    <none>   3m59s   v1.12.8-gke.10
|
我们看到所有节点状态为 Ready,表示我们已经成功搭建了一个 Kubernetes 集群。
安装 Helm
Helm 是 Kubernetes 包管理工具,通过 Helm 可以一键安装 TiDB 的所有分布式组件。安装 Helm 需要同时安装服务端和客户端组件。
1. 安装 helm
 1
 2
 3
 4
 5
 6
 7
 8
 9
10
|
$ curl https://raw.githubusercontent.com/helm/helm/master/scripts/get | bash
  % Total    % Received % Xferd  Average Speed   Time    Time     Time  Current
                                 Dload  Upload   Total   Spent    Left  Speed
100  7001  100  7001    0     0  14083      0 --:--:-- --:--:-- --:--:-- 14086
Helm v2.14.3 is available. Changing from version v2.14.1.
Downloading https://get.helm.sh/helm-v2.14.3-linux-amd64.tar.gz
Preparing to install helm and tiller into /usr/local/bin
helm installed into /usr/local/bin/helm
tiller installed into /usr/local/bin/tiller
Run 'helm init' to configure helm.
|
2. 小技巧
将 helm 复制到我们自己的 $HOME 目录下,这样即使 Google Cloud Shell 断开连接了,我们再次登录也能在gcloud shell 终端访问 Helm:
1
2
3
|
mkdir -p ~/bin && \
cp /usr/local/bin/helm ~/bin && \
echo 'PATH="$PATH:$HOME/bin"' >> ~/.bashrc
|
3. 给 helm 赋权
 1
 2
 3
 4
 5
 6
 7
 8
 9
10
11
12
13
14
15
16
17
18
19
|
$ kubectl apply -f ./manifests/tiller-rbac.yaml && \
helm init --service-account tiller --upgrade
serviceaccount/tiller created
clusterrolebinding.rbac.authorization.k8s.io/tiller-clusterrolebinding created
Creating /home/yangwen_yw/.helm
Creating /home/yangwen_yw/.helm/repository
Creating /home/yangwen_yw/.helm/repository/cache
Creating /home/yangwen_yw/.helm/repository/local
Creating /home/yangwen_yw/.helm/plugins
Creating /home/yangwen_yw/.helm/starters
Creating /home/yangwen_yw/.helm/cache/archive
Creating /home/yangwen_yw/.helm/repository/repositories.yaml
Adding stable repo with URL: https://kubernetes-charts.storage.googleapis.com
Adding local repo with URL: http://127.0.0.1:8879/charts
$HELM_HOME has been configured at /home/yangwen_yw/.helm.
Tiller (the Helm server-side component) has been installed into your Kubernetes Cluster.
Please note: by default, Tiller is deployed with an insecure 'allow unauthenticated users' policy.
To prevent this, run `helm init` with the --tiller-tls-verify flag.
For more information on securing your installation see: https://docs.helm.sh/using_helm/#securing-your-helm-installation
|
为什么要给 helm 赋权呢?(后面再补)
查看处理进度:
1
2
|
$ watch "kubectl get pods --namespace kube-system | grep tiller"
tiller-deploy-779784fbd6-qsfl5                   1/1     Running   0          98s
|
当 Pod 状态为 Running,可以 Ctrl+C 停止并继续下一步。
添加 Helm 仓库
PingCAP Helm 仓库中存放着 PingCAP 发布的 charts,例如 tidb-operator、tidb-cluster 和 tidb-backup 等等。
添加仓库命令:
1
2
3
4
5
6
7
|
$ helm repo add pingcap https://charts.pingcap.org/ && \
> helm repo list
"pingcap" has been added to your repositories
NAME    URL
stable  https://kubernetes-charts.storage.googleapis.com
local   http://127.0.0.1:8879/charts
pingcap https://charts.pingcap.org/
|
查看可用:
 1
 2
 3
 4
 5
 6
 7
 8
 9
10
11
12
13
14
15
16
17
18
|
$ helm repo update && \
> helm search tidb-cluster -l && \
> helm search tidb-operator -l
Hang tight while we grab the latest from your chart repositories...
...Skip local chart repository
...Successfully got an update from the "pingcap" chart repository
...Successfully got an update from the "stable" chart repository
Update Complete.
NAME                    CHART VERSION   APP VERSION     DESCRIPTION
pingcap/tidb-cluster    v1.0.0                          A Helm chart for TiDB Cluster
pingcap/tidb-cluster    v1.0.0-rc.1                     A Helm chart for TiDB Cluster
pingcap/tidb-cluster    v1.0.0-beta.3                   A Helm chart for TiDB Cluster
pingcap/tidb-cluster    v1.0.0-beta.2                   A Helm chart for TiDB Cluster
NAME                    CHART VERSION   APP VERSION     DESCRIPTION
pingcap/tidb-operator   v1.0.0                          tidb-operator Helm chart for Kubernetes
pingcap/tidb-operator   v1.0.0-rc.1                     tidb-operator Helm chart for Kubernetes
pingcap/tidb-operator   v1.0.0-beta.3                   tidb-operator Helm chart for Kubernetes
pingcap/tidb-operator   v1.0.0-beta.2                   tidb-operator Helm chart for Kubernetes
|
部署 TiDB 集群
1. 安装 TiDB 组件 TiDB-Operator
version 可以根据实际情况进行修改。
 1
 2
 3
 4
 5
 6
 7
 8
 9
10
11
12
13
14
15
16
17
18
19
20
21
22
23
24
25
26
27
28
29
30
31
32
33
34
35
36
37
38
39
|
$ kubectl apply -f ./manifests/crd.yaml && kubectl apply -f ./manifests/gke/persistent-disk.yaml && helm install pingcap/tidb-operator -n tidb-admin --namespace=tidb-admin --version=1.0.0
customresourcedefinition.apiextensions.k8s.io/tidbclusters.pingcap.com created
storageclass.storage.k8s.io/pd-ssd created
NAME:   tidb-admin
LAST DEPLOYED: Wed Aug  7 01:43:18 2019
NAMESPACE: tidb-admin
STATUS: DEPLOYED
RESOURCES:
==> v1/ConfigMap
NAME                   DATA  AGE
tidb-scheduler-policy  1     0s
==> v1/Pod(related)
NAME                                      READY  STATUS             RESTARTS  AGE
tidb-controller-manager-6896c8d48d-txhwh  0/1    ContainerCreating  0         0s
tidb-scheduler-75d8979f8b-klxq4           0/2    ContainerCreating  0         0s
==> v1/ServiceAccount
NAME                     SECRETS  AGE
tidb-controller-manager  1        0s
tidb-scheduler           1        0s
==> v1beta1/ClusterRole
NAME                                AGE
tidb-admin:tidb-controller-manager  0s
tidb-admin:tidb-scheduler           0s
==> v1beta1/ClusterRoleBinding
NAME                                AGE
tidb-admin:tidb-controller-manager  0s
tidb-admin:tidb-scheduler           0s
==> v1beta1/Deployment
NAME                     READY  UP-TO-DATE  AVAILABLE  AGE
tidb-controller-manager  0/1    1           0          0s
tidb-scheduler           0/1    1           0          0s
NOTES:
1. Make sure tidb-operator components are running
   kubectl get pods --namespace tidb-admin -l app.kubernetes.io/instance=tidb-admin
2. Install CRD
   kubectl apply -f https://raw.githubusercontent.com/pingcap/tidb-operator/master/manifests/crd.yaml
   kubectl get customresourcedefinitions
3. Modify tidb-cluster/values.yaml and create a TiDB cluster by installing tidb-cluster charts
   helm install tidb-cluster
|
2. 观察 Operator 启动情况
1
2
3
4
|
$ kubectl get pods --namespace tidb-admin -o wide --watch
NAME                                       READY   STATUS    RESTARTS   AGE   IP          NODE                                  NOMINATED NODE
tidb-controller-manager-6896c8d48d-txhwh   1/1     Running   0          61s   10.40.1.3   gke-tidb-default-pool-ac72cc3e-5l05   <none>
tidb-scheduler-75d8979f8b-klxq4            2/2     Running   0          61s   10.40.2.7   gke-tidb-default-pool-ac72cc3e-gflp   <none>
|
如果 tidb-scheduler 和 tidb-controller-manager 状态都为 Running,则可以 Ctrl+C 停止并继续下一步部署一个 TiDB 集群!
3. 一键部署一个 TiDB 集群
 1
 2
 3
 4
 5
 6
 7
 8
 9
10
11
12
13
14
15
16
17
18
19
20
21
22
23
24
25
26
27
28
29
30
31
32
33
34
35
36
37
38
39
40
41
42
43
44
45
46
47
48
49
50
51
52
53
54
55
56
57
58
59
60
61
62
|
$ helm install pingcap/tidb-cluster -n demo --namespace=tidb --set pd.storageClassName=pd-ssd,tikv.storageClassName=pd-ssd --version=1.0.0
NAME:   demo
LAST DEPLOYED: Wed Aug  7 01:47:09 2019
NAMESPACE: tidb
STATUS: DEPLOYED
RESOURCES:
==> v1/ConfigMap
NAME                DATA  AGE
demo-monitor        3     2s
demo-pd-aa6df71f    2     2s
demo-tidb           2     2s
demo-tidb-a4c4bb14  2     2s
demo-tikv-210ef60f  2     2s
==> v1/Pod(related)
NAME                           READY  STATUS             RESTARTS  AGE
demo-discovery-98d56b98-h5zfc  0/1    ContainerCreating  0         1s
demo-monitor-7874dbcc88-6p4tb  0/3    Init:0/1           0         1s
==> v1/Secret
NAME          TYPE    DATA  AGE
demo-monitor  Opaque  2     2s
==> v1/Service
NAME                   TYPE       CLUSTER-IP     EXTERNAL-IP  PORT(S)                         AGE
demo-discovery         ClusterIP  10.43.246.8    <none>       10261/TCP                       2s
demo-grafana           NodePort   10.43.251.51   <none>       3000:30977/TCP                  1s
demo-monitor-reloader  NodePort   10.43.244.184  <none>       9089:30659/TCP                  1s
demo-prometheus        NodePort   10.43.252.52   <none>       9090:31861/TCP                  1s
demo-tidb              NodePort   10.43.251.88   <none>       4000:31276/TCP,10080:31921/TCP  1s
==> v1/ServiceAccount
NAME            SECRETS  AGE
demo-discovery  1        2s
demo-monitor    1        2s
==> v1alpha1/TidbCluster
NAME  AGE
demo  1s
==> v1beta1/Deployment
NAME            READY  UP-TO-DATE  AVAILABLE  AGE
demo-discovery  0/1    1           0          1s
demo-monitor    0/1    1           0          1s
==> v1beta1/Role
NAME            AGE
demo-discovery  2s
demo-monitor    2s
==> v1beta1/RoleBinding
NAME            AGE
demo-discovery  2s
demo-monitor    2s
NOTES:
Cluster Startup
1. Watch tidb-cluster up and running
     watch kubectl get pods --namespace tidb -l app.kubernetes.io/instance=demo -o wide
2. List services in the tidb-cluster
     kubectl get services --namespace tidb -l app.kubernetes.io/instance=demo
Cluster access
* Access tidb-cluster using the MySQL client
    kubectl port-forward -n tidb svc/demo-tidb 4000:4000 &
    mysql -h 127.0.0.1 -P 4000 -u root -D test
  Set a password for your user
    SET PASSWORD FOR 'root'@'%' = 'GKDBG7zd0d'; FLUSH PRIVILEGES;
* View monitor dashboard for TiDB cluster
   kubectl port-forward -n tidb svc/demo-grafana 3000:3000
   Open browser at http://localhost:3000. The default username and password is admin/admin.
   If you are running this from a remote machine, you must specify the server's external IP address.
|
4. 查看启动情况
 1
 2
 3
 4
 5
 6
 7
 8
 9
10
11
12
13
14
15
16
17
18
19
20
21
22
23
24
25
26
27
28
29
30
|
$ kubectl get pods --namespace tidb -o wide --watch
kubectl get pods --namespace tidb -o wide --watch
NAME                            READY   STATUS              RESTARTS   AGE   IP          NODE                                  NOMINATED NODE
demo-discovery-98d56b98-h5zfc   1/1     Running             0          89s   10.40.0.7   gke-tidb-default-pool-ac72cc3e-t4q3   <none>
demo-monitor-7874dbcc88-6p4tb   3/3     Running             0          89s   10.40.1.4   gke-tidb-default-pool-ac72cc3e-5l05   <none>
demo-pd-0                       1/1     Running             0          89s   10.40.1.5   gke-tidb-default-pool-ac72cc3e-5l05   <none>
demo-pd-1                       1/1     Running             0          89s   10.40.2.8   gke-tidb-default-pool-ac72cc3e-gflp   <none>
demo-pd-2                       1/1     Running             0          89s   10.40.0.8   gke-tidb-default-pool-ac72cc3e-t4q3   <none>
demo-tikv-0                     1/1     Running             0          42s   10.40.2.9   gke-tidb-default-pool-ac72cc3e-gflp   <none>
demo-tikv-1                     0/1     ContainerCreating   0          42s   <none>      gke-tidb-default-pool-ac72cc3e-t4q3   <none>
demo-tikv-2                     1/1     Running             0          42s   10.40.1.6   gke-tidb-default-pool-ac72cc3e-5l05   <none>
demo-tikv-1   1/1   Running   0     55s   10.40.0.9   gke-tidb-default-pool-ac72cc3e-t4q3   <none>
demo-tidb-0   0/2   Pending   0     0s    <none>   <none>   <none>
demo-tidb-1   0/2   Pending   0     0s    <none>   <none>   <none>
demo-pd-0   1/1   Running   0     103s   10.40.1.5   gke-tidb-default-pool-ac72cc3e-5l05   <none>
demo-tidb-0   0/2   Pending   0     0s    <none>   gke-tidb-default-pool-ac72cc3e-t4q3   <none>
demo-tidb-1   0/2   Pending   0     0s    <none>   gke-tidb-default-pool-ac72cc3e-gflp   <none>
demo-tidb-0   0/2   ContainerCreating   0     0s    <none>   gke-tidb-default-pool-ac72cc3e-t4q3   <none>
demo-pd-1   1/1   Running   0     103s   10.40.2.8   gke-tidb-default-pool-ac72cc3e-gflp   <none>
demo-tidb-1   0/2   ContainerCreating   0     0s    <none>   gke-tidb-default-pool-ac72cc3e-gflp   <none>
demo-pd-2   1/1   Running   0     103s   10.40.0.8   gke-tidb-default-pool-ac72cc3e-t4q3   <none>
demo-tikv-0   1/1   Running   0     56s   10.40.2.9   gke-tidb-default-pool-ac72cc3e-gflp   <none>
demo-tikv-1   1/1   Running   0     57s   10.40.0.9   gke-tidb-default-pool-ac72cc3e-t4q3   <none>
demo-tikv-2   1/1   Running   0     57s   10.40.1.6   gke-tidb-default-pool-ac72cc3e-5l05   <none>
demo-tidb-0   0/2   ContainerCreating   0     2s    <none>   gke-tidb-default-pool-ac72cc3e-t4q3   <none>
demo-tidb-1   0/2   ContainerCreating   0     2s    <none>   gke-tidb-default-pool-ac72cc3e-gflp   <none>
demo-tidb-1   1/2   Running   0     9s    10.40.2.10   gke-tidb-default-pool-ac72cc3e-gflp   <none>
demo-tidb-0   1/2   Running   0     9s    10.40.0.10   gke-tidb-default-pool-ac72cc3e-t4q3   <none>
demo-tidb-0   2/2   Running   0     25s   10.40.0.10   gke-tidb-default-pool-ac72cc3e-t4q3   <none>
demo-tidb-1   2/2   Running   0     28s   10.40.2.10   gke-tidb-default-pool-ac72cc3e-gflp   <none>
|
该 TiDB 集群将会创建包含 2 个 TiDB pod,3 个 TiKV pod 和 3 个 PD pod。如果所有 pod 状态都为 Running,则可以 Ctrl+C 停止并继续!
访问 TiDB
TiDB 和 Google Cloud Shell 之间建立一个隧道。
1
|
$ kubectl -n tidb port-forward svc/demo-tidb 4000:4000 &>/tmp/port-forward.log &
|
在 Google Cloud Shell 上执行
1
2
|
$ sudo apt-get install -y mysql-client && \
mysql -h 127.0.0.1 -u root -P 4000
|
在 MySQL 终端输入 select tidb_version();
 1
 2
 3
 4
 5
 6
 7
 8
 9
10
11
12
13
14
15
16
17
18
19
|
MySQL [(none)]> select tidb_version();
+---------------------------------------------------------------------------------------------------------------------------------------------------------------------------------------------------------------------------------------------------------------------------------------
----------------------+
| tidb_version()
                      |
+---------------------------------------------------------------------------------------------------------------------------------------------------------------------------------------------------------------------------------------------------------------------------------------
----------------------+
| Release Version: v3.0.1
Git Commit Hash: 9e4e8da3c58c65123db5f26409759fe1847529f8
Git Branch: HEAD
UTC Build Time: 2019-07-16 01:03:40
GoVersion: go version go1.12 linux/amd64
Race Enabled: false
TiKV Min Version: 2.1.0-alpha.1-ff3dd160846b7d1aed9079c389fc188f7f5ea13e
Check Table Before Drop: false |
+---------------------------------------------------------------------------------------------------------------------------------------------------------------------------------------------------------------------------------------------------------------------------------------
----------------------+
1 row in set (0.12 sec)
MySQL [(none)]>
|
我们看到了 TiDB 的版本信息。
扩容 TiDB 集群
1
2
3
|
$ helm upgrade demo pingcap/tidb-cluster --set pd.storageClassName=pd-ssd,tikv.storageClassName=pd-ssd,tikv.replicas=5 --version=1.0.0
Release "demo" has been upgraded.
...
|
查看集群扩容:
 1
 2
 3
 4
 5
 6
 7
 8
 9
10
11
12
13
14
|
kubectl get po -n tidb
NAME                            READY   STATUS    RESTARTS   AGE
demo-discovery-98d56b98-h5zfc   1/1     Running   0          10m
demo-monitor-7874dbcc88-6p4tb   3/3     Running   0          10m
demo-pd-0                       1/1     Running   0          10m
demo-pd-1                       1/1     Running   0          10m
demo-pd-2                       1/1     Running   0          10m
demo-tidb-0                     2/2     Running   0          8m46s
demo-tidb-1                     2/2     Running   0          8m46s
demo-tikv-0                     1/1     Running   0          9m42s
demo-tikv-1                     1/1     Running   0          9m42s
demo-tikv-2                     1/1     Running   0          9m42s
demo-tikv-3                     1/1     Running   0          41s
demo-tikv-4                     1/1     Running   0          41s
|
tikv 有 5 个节点了,说明扩容成功。
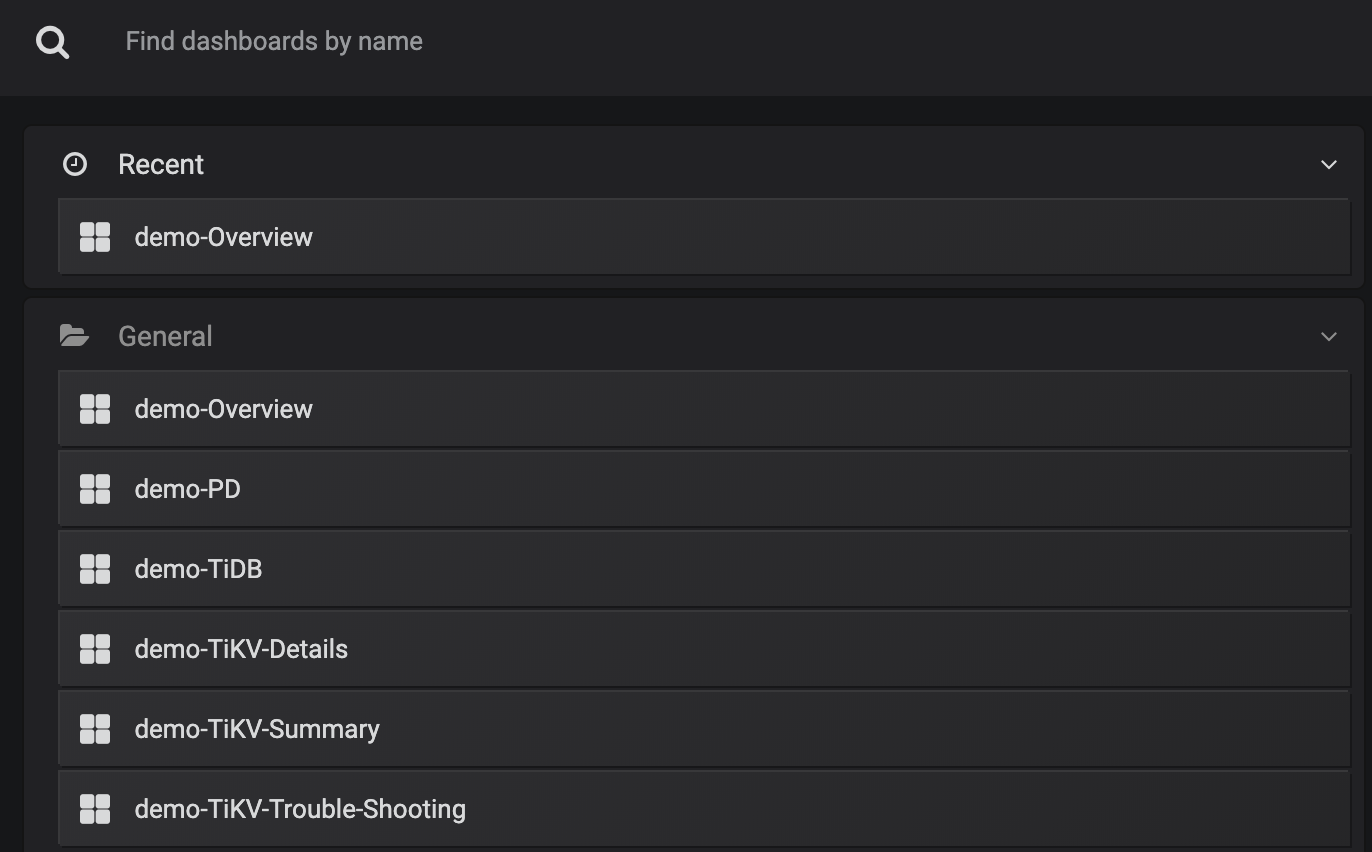
访问 Grafana 面板
1
|
$ kubectl -n tidb port-forward svc/demo-grafana 3000:3000 &>/dev/null &
|
在 Cloud Shell 中,点击 Web Preview 按钮并输入端口 3000,将打开一个新的浏览器标签页访问 Grafana 面板。或者也可以在新浏览器标签或者窗口中直接访问 URL:https://ssh.cloud.google.com/devshell/proxy?port=3000。
将会需要你的账号授权,然后成功之后会自动跳转到一个 https://xxx.appspot.com/?orgId=1 地址。
销毁 TiDB 集群
删除运行的 Pod:
1
2
|
$ helm delete demo --purge
release "demo" deleted
|
清除数据和动态创建的持久化磁盘:
 1
 2
 3
 4
 5
 6
 7
 8
 9
10
11
12
13
14
15
16
17
18
|
$ kubectl delete pvc -n tidb -l app.kubernetes.io/instance=demo,app.kubernetes.io/managed-by=tidb-operator && \
kubectl get pv -l app.kubernetes.io/namespace=tidb,app.kubernetes.io/managed-by=tidb-operator,app.kubernetes.io/instance=demo -o name | xargs -I {} kubectl patch {} -p '{"spec":{"persistentVolumeReclaimPolicy":"Delete"}}'
persistentvolumeclaim "pd-demo-pd-0" deleted
persistentvolumeclaim "pd-demo-pd-1" deleted
persistentvolumeclaim "pd-demo-pd-2" deleted
persistentvolumeclaim "tikv-demo-tikv-0" deleted
persistentvolumeclaim "tikv-demo-tikv-1" deleted
persistentvolumeclaim "tikv-demo-tikv-2" deleted
persistentvolumeclaim "tikv-demo-tikv-3" deleted
persistentvolumeclaim "tikv-demo-tikv-4" deleted
persistentvolume/pvc-374cc5be-b872-11e9-b5da-42010a8a0044 patched
persistentvolume/pvc-3754b242-b872-11e9-b5da-42010a8a0044 patched
persistentvolume/pvc-375bb3c7-b872-11e9-b5da-42010a8a0044 patched
persistentvolume/pvc-5341546c-b872-11e9-b5da-42010a8a0044 patched
persistentvolume/pvc-53474aa0-b872-11e9-b5da-42010a8a0044 patched
persistentvolume/pvc-5352d7c5-b872-11e9-b5da-42010a8a0044 patched
persistentvolume/pvc-9587e920-b873-11e9-b5da-42010a8a0044 patched
persistentvolume/pvc-95967338-b873-11e9-b5da-42010a8a0044 patched
|
删除整个 kubernetes 集群
1
2
3
4
5
6
7
8
|
$ gcloud container clusters delete tidb
The following clusters will be deleted.
 - [tidb] in [us-west1-a]
Do you want to continue (Y/n)?  y
Deleting cluster tidb...done.
Deleted [https://container.googleapis.com/v1/projects/maiyang1/zones/us-west1-a/clusters/tidb].
[1]-  Done                    kubectl -n tidb port-forward svc/demo-tidb 4000:4000 &> /tmp/port-forward.log
[2]+  Done                    kubectl -n tidb port-forward svc/demo-grafana 3000:3000 &> /dev/null
|
未删除时:
实践过程中遇到的问题
- 首先你需要创建 project,得到 project_id;
- 必须要授权才可以创建 tidb;(ERROR: (gcloud.container.clusters.create) ResponseError: code=403, message=Kubernetes Engine API is not enabled for this project. Please ensure it is enabled in Google Cloud Console and try again: visit https://console.cloud.google.com/apis/api/container.googleapis.com/overview?p
roject=maiyang1 to do so.)【启用 Kubernetes Engine API,需要结算账号】
参考资料
- 在 GCP 上通过 Kubernetes 部署 TiDB 集群
- 创建和管理项目
茶歇驿站
一个可以让你停下来看一看,在茶歇之余给你帮助的小站,这里的内容主要是后端技术,个人管理,团队管理,以及其他个人杂想。